mirror of https://github.com/tiangolo/fastapi.git
471 lines
18 KiB
Markdown
471 lines
18 KiB
Markdown
# FastAPI
|
||
|
||
<style>
|
||
.md-content .md-typeset h1 { display: none; }
|
||
</style>
|
||
|
||
<p align="center">
|
||
<a href="https://fastapi.tiangolo.com"><img src="https://fastapi.tiangolo.com/img/logo-margin/logo-teal.png" alt="FastAPI"></a>
|
||
</p>
|
||
<p align="center">
|
||
<em>FastAPI 框架,高性能,易于学习,高效编码,生产可用</em>
|
||
</p>
|
||
<p align="center">
|
||
<a href="https://github.com/fastapi/fastapi/actions?query=workflow%3ATest+event%3Apush+branch%3Amaster" target="_blank">
|
||
<img src="https://github.com/fastapi/fastapi/actions/workflows/test.yml/badge.svg?event=push&branch=master" alt="Test">
|
||
</a>
|
||
<a href="https://coverage-badge.samuelcolvin.workers.dev/redirect/fastapi/fastapi" target="_blank">
|
||
<img src="https://coverage-badge.samuelcolvin.workers.dev/fastapi/fastapi.svg" alt="Coverage">
|
||
</a>
|
||
<a href="https://pypi.org/project/fastapi" target="_blank">
|
||
<img src="https://img.shields.io/pypi/v/fastapi?color=%2334D058&label=pypi%20package" alt="Package version">
|
||
</a>
|
||
<a href="https://pypi.org/project/fastapi" target="_blank">
|
||
<img src="https://img.shields.io/pypi/pyversions/fastapi.svg?color=%2334D058" alt="Supported Python versions">
|
||
</a>
|
||
</p>
|
||
|
||
---
|
||
|
||
**文档**: <a href="https://fastapi.tiangolo.com" target="_blank">https://fastapi.tiangolo.com</a>
|
||
|
||
**源码**: <a href="https://github.com/fastapi/fastapi" target="_blank">https://github.com/fastapi/fastapi</a>
|
||
|
||
---
|
||
|
||
FastAPI 是一个用于构建 API 的现代、快速(高性能)的 web 框架,使用 Python 并基于标准的 Python 类型提示。
|
||
|
||
关键特性:
|
||
|
||
* **快速**:可与 **NodeJS** 和 **Go** 并肩的极高性能(归功于 Starlette 和 Pydantic)。[最快的 Python web 框架之一](#_11)。
|
||
|
||
* **高效编码**:提高功能开发速度约 200% 至 300%。*
|
||
* **更少 bug**:减少约 40% 的人为(开发者)导致错误。*
|
||
* **智能**:极佳的编辑器支持。处处皆可<abbr title="也被称为自动完成、智能感知">自动补全</abbr>,减少调试时间。
|
||
* **简单**:设计的易于使用和学习,阅读文档的时间更短。
|
||
* **简短**:使代码重复最小化。通过不同的参数声明实现丰富功能。bug 更少。
|
||
* **健壮**:生产可用级别的代码。还有自动生成的交互式文档。
|
||
* **标准化**:基于(并完全兼容)API 的相关开放标准:<a href="https://github.com/OAI/OpenAPI-Specification" class="external-link" target="_blank">OpenAPI</a> (以前被称为 Swagger) 和 <a href="https://json-schema.org/" class="external-link" target="_blank">JSON Schema</a>。
|
||
|
||
<small>* 根据对某个构建线上应用的内部开发团队所进行的测试估算得出。</small>
|
||
|
||
## Sponsors
|
||
|
||
<!-- sponsors -->
|
||
|
||
{% if sponsors %}
|
||
{% for sponsor in sponsors.gold -%}
|
||
<a href="{{ sponsor.url }}" target="_blank" title="{{ sponsor.title }}"><img src="{{ sponsor.img }}" style="border-radius:15px"></a>
|
||
{% endfor -%}
|
||
{%- for sponsor in sponsors.silver -%}
|
||
<a href="{{ sponsor.url }}" target="_blank" title="{{ sponsor.title }}"><img src="{{ sponsor.img }}" style="border-radius:15px"></a>
|
||
{% endfor %}
|
||
{% endif %}
|
||
|
||
<!-- /sponsors -->
|
||
|
||
<a href="https://fastapi.tiangolo.com/fastapi-people/#sponsors" class="external-link" target="_blank">Other sponsors</a>
|
||
|
||
## 评价
|
||
|
||
「_[...] 最近我一直在使用 **FastAPI**。[...] 实际上我正在计划将其用于我所在的**微软**团队的所有**机器学习服务**。其中一些服务正被集成进核心 **Windows** 产品和一些 **Office** 产品。_」
|
||
|
||
<div style="text-align: right; margin-right: 10%;">Kabir Khan - <strong>微软</strong> <a href="https://github.com/fastapi/fastapi/pull/26" target="_blank"><small>(ref)</small></a></div>
|
||
|
||
---
|
||
|
||
「_我们选择了 **FastAPI** 来创建用于获取**预测结果**的 **REST** 服务。[用于 Ludwig]_」
|
||
|
||
<div style="text-align: right; margin-right: 10%;">Piero Molino,Yaroslav Dudin 和 Sai Sumanth Miryala - <strong>Uber</strong> <a href="https://eng.uber.com/ludwig-v0-2/" target="_blank"><small>(ref)</small></a></div>
|
||
|
||
---
|
||
|
||
「_**Netflix** 非常高兴地宣布,正式开源我们的**危机管理**编排框架:**Dispatch**![使用 **FastAPI** 构建]_」
|
||
|
||
<div style="text-align: right; margin-right: 10%;">Kevin Glisson,Marc Vilanova,Forest Monsen - <strong>Netflix</strong> <a href="https://netflixtechblog.com/introducing-dispatch-da4b8a2a8072" target="_blank"><small>(ref)</small></a></div>
|
||
|
||
---
|
||
|
||
「_**FastAPI** 让我兴奋的欣喜若狂。它太棒了!_」
|
||
|
||
<div style="text-align: right; margin-right: 10%;">Brian Okken - <strong><a href="https://pythonbytes.fm/episodes/show/123/time-to-right-the-py-wrongs?time_in_sec=855" target="_blank">Python Bytes</a> 播客主持人</strong> <a href="https://x.com/brianokken/status/1112220079972728832" target="_blank"><small>(ref)</small></a></div>
|
||
|
||
---
|
||
|
||
「_老实说,你的作品看起来非常可靠和优美。在很多方面,这就是我想让 **Hug** 成为的样子 - 看到有人实现了它真的很鼓舞人心。_」
|
||
|
||
<div style="text-align: right; margin-right: 10%;">Timothy Crosley - <strong><a href="https://github.com/hugapi/hug" target="_blank">Hug</a> 作者</strong> <a href="https://news.ycombinator.com/item?id=19455465" target="_blank"><small>(ref)</small></a></div>
|
||
|
||
---
|
||
|
||
「_如果你正打算学习一个**现代框架**用来构建 REST API,来看下 **FastAPI** [...] 它快速、易用且易于学习 [...]_」
|
||
|
||
「_我们已经将 **API** 服务切换到了 **FastAPI** [...] 我认为你会喜欢它的 [...]_」
|
||
|
||
<div style="text-align: right; margin-right: 10%;">Ines Montani - Matthew Honnibal - <strong><a href="https://explosion.ai" target="_blank">Explosion AI</a> 创始人 - <a href="https://spacy.io" target="_blank">spaCy</a> 作者</strong> <a href="https://x.com/_inesmontani/status/1144173225322143744" target="_blank"><small>(ref)</small></a> - <a href="https://x.com/honnibal/status/1144031421859655680" target="_blank"><small>(ref)</small></a></div>
|
||
|
||
---
|
||
|
||
## **Typer**,命令行中的 FastAPI
|
||
|
||
<a href="https://typer.tiangolo.com" target="_blank"><img src="https://typer.tiangolo.com/img/logo-margin/logo-margin-vector.svg" style="width: 20%;"></a>
|
||
|
||
如果你正在开发一个在终端中运行的<abbr title="Command Line Interface">命令行</abbr>应用而不是 web API,不妨试下 <a href="https://typer.tiangolo.com/" class="external-link" target="_blank">**Typer**</a>。
|
||
|
||
**Typer** 是 FastAPI 的小同胞。它想要成为**命令行中的 FastAPI**。 ⌨️ 🚀
|
||
|
||
## 依赖
|
||
|
||
Python 及更高版本
|
||
|
||
FastAPI 站在以下巨人的肩膀之上:
|
||
|
||
* <a href="https://www.starlette.dev/" class="external-link" target="_blank">Starlette</a> 负责 web 部分。
|
||
* <a href="https://docs.pydantic.dev/" class="external-link" target="_blank">Pydantic</a> 负责数据部分。
|
||
|
||
## 安装
|
||
|
||
<div class="termy">
|
||
|
||
```console
|
||
$ pip install fastapi
|
||
|
||
---> 100%
|
||
```
|
||
|
||
</div>
|
||
|
||
你还会需要一个 ASGI 服务器,生产环境可以使用 <a href="https://www.uvicorn.dev" class="external-link" target="_blank">Uvicorn</a> 或者 <a href="https://github.com/pgjones/hypercorn" class="external-link" target="_blank">Hypercorn</a>。
|
||
|
||
<div class="termy">
|
||
|
||
```console
|
||
$ pip install "uvicorn[standard]"
|
||
|
||
---> 100%
|
||
```
|
||
|
||
</div>
|
||
|
||
## 示例
|
||
|
||
### 创建
|
||
|
||
* 创建一个 `main.py` 文件并写入以下内容:
|
||
|
||
```Python
|
||
from typing import Union
|
||
|
||
from fastapi import FastAPI
|
||
|
||
app = FastAPI()
|
||
|
||
|
||
@app.get("/")
|
||
def read_root():
|
||
return {"Hello": "World"}
|
||
|
||
|
||
@app.get("/items/{item_id}")
|
||
def read_item(item_id: int, q: Union[str, None] = None):
|
||
return {"item_id": item_id, "q": q}
|
||
```
|
||
|
||
<details markdown="1">
|
||
<summary>或者使用 <code>async def</code>...</summary>
|
||
|
||
如果你的代码里会出现 `async` / `await`,请使用 `async def`:
|
||
|
||
```Python hl_lines="9 14"
|
||
from typing import Union
|
||
|
||
from fastapi import FastAPI
|
||
|
||
app = FastAPI()
|
||
|
||
|
||
@app.get("/")
|
||
async def read_root():
|
||
return {"Hello": "World"}
|
||
|
||
|
||
@app.get("/items/{item_id}")
|
||
async def read_item(item_id: int, q: Union[str, None] = None):
|
||
return {"item_id": item_id, "q": q}
|
||
```
|
||
|
||
**Note**:
|
||
|
||
如果你不知道是否会用到,可以查看文档的 _"In a hurry?"_ 章节中 <a href="https://fastapi.tiangolo.com/zh/async/#in-a-hurry" target="_blank">关于 `async` 和 `await` 的部分</a>。
|
||
|
||
</details>
|
||
|
||
### 运行
|
||
|
||
通过以下命令运行服务器:
|
||
|
||
<div class="termy">
|
||
|
||
```console
|
||
$ uvicorn main:app --reload
|
||
|
||
INFO: Uvicorn running on http://127.0.0.1:8000 (Press CTRL+C to quit)
|
||
INFO: Started reloader process [28720]
|
||
INFO: Started server process [28722]
|
||
INFO: Waiting for application startup.
|
||
INFO: Application startup complete.
|
||
```
|
||
|
||
</div>
|
||
|
||
<details markdown="1">
|
||
<summary>关于 <code>uvicorn main:app --reload</code> 命令......</summary>
|
||
|
||
`uvicorn main:app` 命令含义如下:
|
||
|
||
* `main`:`main.py` 文件(一个 Python "模块")。
|
||
* `app`:在 `main.py` 文件中通过 `app = FastAPI()` 创建的对象。
|
||
* `--reload`:让服务器在更新代码后重新启动。仅在开发时使用该选项。
|
||
|
||
</details>
|
||
|
||
### 检查
|
||
|
||
使用浏览器访问 <a href="http://127.0.0.1:8000/items/5?q=somequery" class="external-link" target="_blank">http://127.0.0.1:8000/items/5?q=somequery</a>。
|
||
|
||
你将会看到如下 JSON 响应:
|
||
|
||
```JSON
|
||
{"item_id": 5, "q": "somequery"}
|
||
```
|
||
|
||
你已经创建了一个具有以下功能的 API:
|
||
|
||
* 通过 _路径_ `/` 和 `/items/{item_id}` 接受 HTTP 请求。
|
||
* 以上 _路径_ 都接受 `GET` <em>操作</em>(也被称为 HTTP _方法_)。
|
||
* `/items/{item_id}` _路径_ 有一个 _路径参数_ `item_id` 并且应该为 `int` 类型。
|
||
* `/items/{item_id}` _路径_ 有一个可选的 `str` 类型的 _查询参数_ `q`。
|
||
|
||
### 交互式 API 文档
|
||
|
||
现在访问 <a href="http://127.0.0.1:8000/docs" class="external-link" target="_blank">http://127.0.0.1:8000/docs</a>。
|
||
|
||
你会看到自动生成的交互式 API 文档(由 <a href="https://github.com/swagger-api/swagger-ui" class="external-link" target="_blank">Swagger UI</a>生成):
|
||
|
||

|
||
|
||
### 可选的 API 文档
|
||
|
||
访问 <a href="http://127.0.0.1:8000/redoc" class="external-link" target="_blank">http://127.0.0.1:8000/redoc</a>。
|
||
|
||
你会看到另一个自动生成的文档(由 <a href="https://github.com/Rebilly/ReDoc" class="external-link" target="_blank">ReDoc</a> 生成):
|
||
|
||

|
||
|
||
## 示例升级
|
||
|
||
现在修改 `main.py` 文件来从 `PUT` 请求中接收请求体。
|
||
|
||
我们借助 Pydantic 来使用标准的 Python 类型声明请求体。
|
||
|
||
```Python hl_lines="4 9-12 25-27"
|
||
from typing import Union
|
||
|
||
from fastapi import FastAPI
|
||
from pydantic import BaseModel
|
||
|
||
app = FastAPI()
|
||
|
||
|
||
class Item(BaseModel):
|
||
name: str
|
||
price: float
|
||
is_offer: Union[bool, None] = None
|
||
|
||
|
||
@app.get("/")
|
||
def read_root():
|
||
return {"Hello": "World"}
|
||
|
||
|
||
@app.get("/items/{item_id}")
|
||
def read_item(item_id: int, q: Union[str, None] = None):
|
||
return {"item_id": item_id, "q": q}
|
||
|
||
|
||
@app.put("/items/{item_id}")
|
||
def update_item(item_id: int, item: Item):
|
||
return {"item_name": item.name, "item_id": item_id}
|
||
```
|
||
|
||
服务器将会自动重载(因为在上面的步骤中你向 `uvicorn` 命令添加了 `--reload` 选项)。
|
||
|
||
### 交互式 API 文档升级
|
||
|
||
访问 <a href="http://127.0.0.1:8000/docs" class="external-link" target="_blank">http://127.0.0.1:8000/docs</a>。
|
||
|
||
* 交互式 API 文档将会自动更新,并加入新的请求体:
|
||
|
||

|
||
|
||
* 点击「Try it out」按钮,之后你可以填写参数并直接调用 API:
|
||
|
||

|
||
|
||
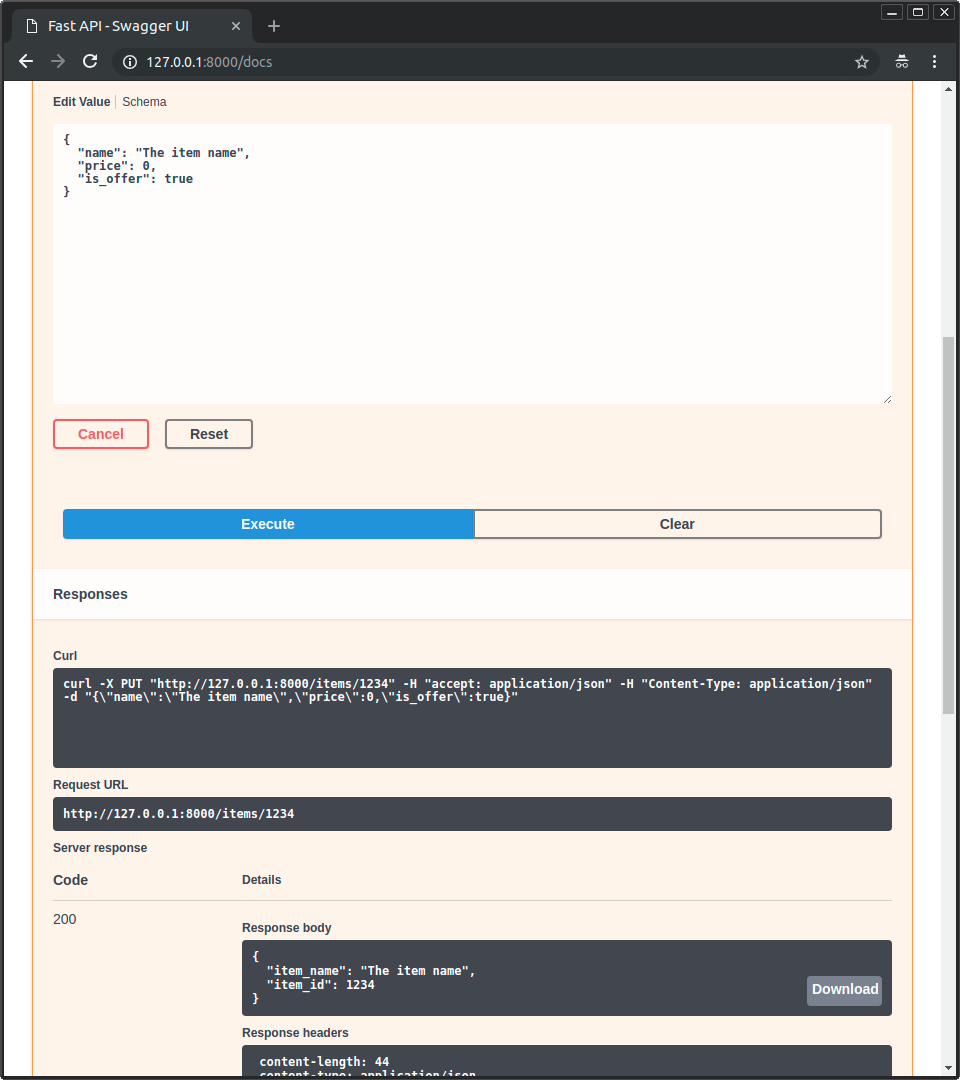
* 然后点击「Execute」按钮,用户界面将会和 API 进行通信,发送参数,获取结果并在屏幕上展示:
|
||
|
||
|
||
|
||
### 可选文档升级
|
||
|
||
访问 <a href="http://127.0.0.1:8000/redoc" class="external-link" target="_blank">http://127.0.0.1:8000/redoc</a>。
|
||
|
||
* 可选文档同样会体现新加入的请求参数和请求体:
|
||
|
||

|
||
|
||
### 总结
|
||
|
||
总的来说,你就像声明函数的参数类型一样只声明了**一次**请求参数、请求体等的类型。
|
||
|
||
你使用了标准的现代 Python 类型来完成声明。
|
||
|
||
你不需要去学习新的语法、了解特定库的方法或类,等等。
|
||
|
||
只需要使用标准的 **Python 及更高版本**。
|
||
|
||
举个例子,比如声明 `int` 类型:
|
||
|
||
```Python
|
||
item_id: int
|
||
```
|
||
|
||
或者一个更复杂的 `Item` 模型:
|
||
|
||
```Python
|
||
item: Item
|
||
```
|
||
|
||
......在进行一次声明之后,你将获得:
|
||
|
||
* 编辑器支持,包括:
|
||
* 自动补全
|
||
* 类型检查
|
||
* 数据校验:
|
||
* 在校验失败时自动生成清晰的错误信息
|
||
* 对多层嵌套的 JSON 对象依然执行校验
|
||
* <abbr title="也被称为:序列化或解析">转换</abbr> 来自网络请求的输入数据为 Python 数据类型。包括以下数据:
|
||
* JSON
|
||
* 路径参数
|
||
* 查询参数
|
||
* Cookies
|
||
* 请求头
|
||
* 表单
|
||
* 文件
|
||
* <abbr title="也被称为:序列化或解析">转换</abbr> 输出的数据:转换 Python 数据类型为供网络传输的 JSON 数据:
|
||
* 转换 Python 基础类型 (`str`、 `int`、 `float`、 `bool`、 `list` 等)
|
||
* `datetime` 对象
|
||
* `UUID` 对象
|
||
* 数据库模型
|
||
* ......以及更多其他类型
|
||
* 自动生成的交互式 API 文档,包括两种可选的用户界面:
|
||
* Swagger UI
|
||
* ReDoc
|
||
|
||
---
|
||
|
||
回到前面的代码示例,**FastAPI** 将会:
|
||
|
||
* 校验 `GET` 和 `PUT` 请求的路径中是否含有 `item_id`。
|
||
* 校验 `GET` 和 `PUT` 请求中的 `item_id` 是否为 `int` 类型。
|
||
* 如果不是,客户端将会收到清晰有用的错误信息。
|
||
* 检查 `GET` 请求中是否有命名为 `q` 的可选查询参数(比如 `http://127.0.0.1:8000/items/foo?q=somequery`)。
|
||
* 因为 `q` 被声明为 `= None`,所以它是可选的。
|
||
* 如果没有 `None` 它将会是必需的 (如 `PUT` 例子中的请求体)。
|
||
* 对于访问 `/items/{item_id}` 的 `PUT` 请求,将请求体读取为 JSON 并:
|
||
* 检查是否有必需属性 `name` 并且值为 `str` 类型 。
|
||
* 检查是否有必需属性 `price` 并且值为 `float` 类型。
|
||
* 检查是否有可选属性 `is_offer`, 如果有的话值应该为 `bool` 类型。
|
||
* 以上过程对于多层嵌套的 JSON 对象同样也会执行
|
||
* 自动对 JSON 进行转换或转换成 JSON。
|
||
* 通过 OpenAPI 文档来记录所有内容,可被用于:
|
||
* 交互式文档系统
|
||
* 许多编程语言的客户端代码自动生成系统
|
||
* 直接提供 2 种交互式文档 web 界面。
|
||
|
||
---
|
||
|
||
虽然我们才刚刚开始,但其实你已经了解了这一切是如何工作的。
|
||
|
||
尝试更改下面这行代码:
|
||
|
||
```Python
|
||
return {"item_name": item.name, "item_id": item_id}
|
||
```
|
||
|
||
......从:
|
||
|
||
```Python
|
||
... "item_name": item.name ...
|
||
```
|
||
|
||
......改为:
|
||
|
||
```Python
|
||
... "item_price": item.price ...
|
||
```
|
||
|
||
......注意观察编辑器是如何自动补全属性并且还知道它们的类型:
|
||
|
||

|
||
|
||
<a href="https://fastapi.tiangolo.com/zh/tutorial/">教程 - 用户指南</a> 中有包含更多特性的更完整示例。
|
||
|
||
**剧透警告**: 教程 - 用户指南中的内容有:
|
||
|
||
* 对来自不同地方的参数进行声明,如:**请求头**、**cookies**、**form 表单**以及**上传的文件**。
|
||
* 如何设置**校验约束**如 `maximum_length` 或者 `regex`。
|
||
* 一个强大并易于使用的 **<abbr title="也被称为 components, resources, providers, services, injectables">依赖注入</abbr>** 系统。
|
||
* 安全性和身份验证,包括通过 **JWT 令牌**和 **HTTP 基本身份认证**来支持 **OAuth2**。
|
||
* 更进阶(但同样简单)的技巧来声明 **多层嵌套 JSON 模型** (借助 Pydantic)。
|
||
* 许多额外功能(归功于 Starlette)比如:
|
||
* **WebSockets**
|
||
* **GraphQL**
|
||
* 基于 HTTPX 和 `pytest` 的极其简单的测试
|
||
* **CORS**
|
||
* **Cookie Sessions**
|
||
* ......以及更多
|
||
|
||
## 性能
|
||
|
||
独立机构 TechEmpower 所作的基准测试结果显示,基于 Uvicorn 运行的 **FastAPI** 程序是 <a href="https://www.techempower.com/benchmarks/#section=test&runid=7464e520-0dc2-473d-bd34-dbdfd7e85911&hw=ph&test=query&l=zijzen-7" class="external-link" target="_blank">最快的 Python web 框架之一</a>,仅次于 Starlette 和 Uvicorn 本身(FastAPI 内部使用了它们)。(*)
|
||
|
||
想了解更多,请查阅 <a href="https://fastapi.tiangolo.com/zh/benchmarks/" class="internal-link" target="_blank">基准测试</a> 章节。
|
||
|
||
## 可选依赖
|
||
|
||
用于 Pydantic:
|
||
|
||
* <a href="https://github.com/JoshData/python-email-validator" target="_blank"><code>email-validator</code></a> - 用于 email 校验。
|
||
|
||
用于 Starlette:
|
||
|
||
* <a href="https://www.python-httpx.org" target="_blank"><code>httpx</code></a> - 使用 `TestClient` 时安装。
|
||
* <a href="https://jinja.palletsprojects.com" target="_blank"><code>jinja2</code></a> - 使用默认模板配置时安装。
|
||
* <a href="https://github.com/Kludex/python-multipart" target="_blank"><code>python-multipart</code></a> - 需要通过 `request.form()` 对表单进行<abbr title="将来自 HTTP 请求中的字符串转换为 Python 数据类型">「解析」</abbr>时安装。
|
||
* <a href="https://pythonhosted.org/itsdangerous/" target="_blank"><code>itsdangerous</code></a> - 需要 `SessionMiddleware` 支持时安装。
|
||
* <a href="https://pyyaml.org/wiki/PyYAMLDocumentation" target="_blank"><code>pyyaml</code></a> - 使用 Starlette 提供的 `SchemaGenerator` 时安装(有 FastAPI 你可能并不需要它)。
|
||
* <a href="https://graphene-python.org/" target="_blank"><code>graphene</code></a> - 需要 `GraphQLApp` 支持时安装。
|
||
|
||
用于 FastAPI / Starlette:
|
||
|
||
* <a href="https://www.uvicorn.dev" target="_blank"><code>uvicorn</code></a> - 用于加载和运行你的应用程序的服务器。
|
||
* <a href="https://github.com/ijl/orjson" target="_blank"><code>orjson</code></a> - 使用 `ORJSONResponse` 时安装。
|
||
* <a href="https://github.com/esnme/ultrajson" target="_blank"><code>ujson</code></a> - 使用 `UJSONResponse` 时安装。
|
||
|
||
你可以通过 `pip install "fastapi[all]"` 命令来安装以上所有依赖。
|
||
|
||
## 许可协议
|
||
|
||
该项目遵循 MIT 许可协议。
|