mirror of https://github.com/tiangolo/fastapi.git
456 lines
21 KiB
Markdown
456 lines
21 KiB
Markdown
<p align="center">
|
||
<a href="https://fastapi.tiangolo.com"><img src="https://fastapi.tiangolo.com/img/logo-margin/logo-teal.png" alt="FastAPI"></a>
|
||
</p>
|
||
<p align="center">
|
||
<em>FastAPI framework, high performance, easy to learn, fast to code, ready for production</em>
|
||
</p>
|
||
<p align="center">
|
||
<a href="https://travis-ci.com/tiangolo/fastapi" target="_blank">
|
||
<img src="https://travis-ci.com/tiangolo/fastapi.svg?branch=master" alt="Build Status">
|
||
</a>
|
||
<a href="https://codecov.io/gh/tiangolo/fastapi" target="_blank">
|
||
<img src="https://img.shields.io/codecov/c/github/tiangolo/fastapi" alt="Coverage">
|
||
</a>
|
||
<a href="https://pypi.org/project/fastapi" target="_blank">
|
||
<img src="https://badge.fury.io/py/fastapi.svg" alt="Package version">
|
||
</a>
|
||
</p>
|
||
|
||
---
|
||
|
||
**ドキュメント**: <a href="https://fastapi.tiangolo.com" target="_blank">https://fastapi.tiangolo.com</a>
|
||
|
||
**ソースコード**: <a href="https://github.com/tiangolo/fastapi" target="_blank">https://github.com/tiangolo/fastapi</a>
|
||
|
||
---
|
||
|
||
FastAPI は、Pythonの標準である型ヒントに基づいてPython 3.6 以降でAPI を構築するための、モダンで、高速(高パフォーマンス)な、Web フレームワークです。
|
||
|
||
主な特徴:
|
||
|
||
- **高速**: **NodeJS** や **Go** 並みのとても高いパフォーマンス (Starlette と Pydantic のおかげです)。 [最も高速な Python フレームワークの一つです](#performance).
|
||
|
||
- **高速なコーディング**: 開発速度を約 200%~300%向上させます。 \*
|
||
- **少ないバグ**: 開発者起因のヒューマンエラーを約 40%削減します。 \*
|
||
- **直感的**: 素晴らしいエディタのサポートや <abbr title="also known as auto-complete, autocompletion, IntelliSense">オートコンプリート。</abbr> デバッグ時間を削減します。
|
||
- **簡単**: 簡単に利用、習得できるようにデザインされています。ドキュメントを読む時間を削減します。
|
||
- **短い**: コードの重複を最小限にしています。各パラメータからの複数の機能。少ないバグ。
|
||
- **堅牢性**: 自動対話ドキュメントを使用して、本番環境で使用できるコードを取得します。
|
||
- **Standards-based**: API のオープンスタンダードに基づいており、完全に互換性があります: <a href="https://github.com/OAI/OpenAPI-Specification" class="external-link" target="_blank">OpenAPI</a> (以前は Swagger として知られていました) や <a href="https://json-schema.org/" class="external-link" target="_blank">JSON スキーマ</a>.
|
||
|
||
<small>\* 本番アプリケーションを構築している開発チームのテストによる見積もり。</small>
|
||
|
||
## Sponsors
|
||
|
||
<!-- sponsors -->
|
||
|
||
{% if sponsors %}
|
||
{% for sponsor in sponsors.gold -%}
|
||
<a href="{{ sponsor.url }}" target="_blank" title="{{ sponsor.title }}"><img src="{{ sponsor.img }}" style="border-radius:15px"></a>
|
||
{% endfor -%}
|
||
{%- for sponsor in sponsors.silver -%}
|
||
<a href="{{ sponsor.url }}" target="_blank" title="{{ sponsor.title }}"><img src="{{ sponsor.img }}" style="border-radius:15px"></a>
|
||
{% endfor %}
|
||
{% endif %}
|
||
|
||
<!-- /sponsors -->
|
||
|
||
<a href="https://fastapi.tiangolo.com/fastapi-people/#sponsors" class="external-link" target="_blank">Other sponsors</a>
|
||
|
||
## 評価
|
||
|
||
"_[...] 最近 **FastAPI** を使っています。 [...] 実際に私のチームの全ての **Microsoft の機械学習サービス** で使用する予定です。 そのうちのいくつかのコアな**Windows**製品と**Office**製品に統合されつつあります。_"
|
||
|
||
<div style="text-align: right; margin-right: 10%;">Kabir Khan - <strong>Microsoft</strong> <a href="https://github.com/tiangolo/fastapi/pull/26" target="_blank"><small>(ref)</small></a></div>
|
||
|
||
---
|
||
|
||
"_FastAPIライブラリを採用し、クエリで**予測値**を取得できる**REST**サーバを構築しました。 [for Ludwig]_"
|
||
|
||
<div style="text-align: right; margin-right: 10%;">Piero Molino, Yaroslav Dudin, and Sai Sumanth Miryala - <strong>Uber</strong> <a href="https://eng.uber.com/ludwig-v0-2/" target="_blank"><small>(ref)</small></a></div>
|
||
|
||
---
|
||
|
||
"_**Netflix** は、**危機管理**オーケストレーションフレームワーク、**Dispatch**のオープンソースリリースを発表できることをうれしく思います。 [built with **FastAPI**]_"
|
||
|
||
<div style="text-align: right; margin-right: 10%;">Kevin Glisson, Marc Vilanova, Forest Monsen - <strong>Netflix</strong> <a href="https://netflixtechblog.com/introducing-dispatch-da4b8a2a8072" target="_blank"><small>(ref)</small></a></div>
|
||
|
||
---
|
||
|
||
"_私は**FastAPI**にワクワクしています。 めちゃくちゃ楽しいです!_"
|
||
|
||
<div style="text-align: right; margin-right: 10%;">Brian Okken - <strong><a href="https://pythonbytes.fm/episodes/show/123/time-to-right-the-py-wrongs?time_in_sec=855" target="_blank">Python Bytes</a> podcast host</strong> <a href="https://twitter.com/brianokken/status/1112220079972728832" target="_blank"><small>(ref)</small></a></div>
|
||
|
||
---
|
||
|
||
"_正直、超堅実で洗練されているように見えます。いろんな意味で、それは私がハグしたかったものです。_"
|
||
|
||
<div style="text-align: right; margin-right: 10%;">Timothy Crosley - <strong><a href="https://www.hug.rest/" target="_blank">Hug</a> creator</strong> <a href="https://news.ycombinator.com/item?id=19455465" target="_blank"><small>(ref)</small></a></div>
|
||
|
||
---
|
||
|
||
"_REST API を構築するための**モダンなフレームワーク**を学びたい方は、**FastAPI** [...] をチェックしてみてください。 [...] 高速で, 使用、習得が簡単です。[...]_"
|
||
|
||
"_私たちの**API**は**FastAPI**に切り替えました。[...] きっと気に入ると思います。 [...]_"
|
||
|
||
<div style="text-align: right; margin-right: 10%;">Ines Montani - Matthew Honnibal - <strong><a href="https://explosion.ai" target="_blank">Explosion AI</a> founders - <a href="https://spacy.io" target="_blank">spaCy</a> creators</strong> <a href="https://twitter.com/_inesmontani/status/1144173225322143744" target="_blank"><small>(ref)</small></a> - <a href="https://twitter.com/honnibal/status/1144031421859655680" target="_blank"><small>(ref)</small></a></div>
|
||
|
||
---
|
||
|
||
## **Typer**, the FastAPI of CLIs
|
||
|
||
<a href="https://typer.tiangolo.com" target="_blank"><img src="https://typer.tiangolo.com/img/logo-margin/logo-margin-vector.svg" style="width: 20%;"></a>
|
||
|
||
もし Web API の代わりにターミナルで使用する<abbr title="Command Line Interface">CLI</abbr>アプリを構築する場合は、<a href="https://typer.tiangolo.com/" class="external-link" target="_blank">**Typer**</a>を確認してください。
|
||
|
||
**Typer**は FastAPI の弟分です。そして、**CLI 版 の FastAPI**を意味しています。
|
||
|
||
## 必要条件
|
||
|
||
Python 3.7+
|
||
|
||
FastAPI は巨人の肩の上に立っています。
|
||
|
||
- Web の部分は<a href="https://www.starlette.io/" class="external-link" target="_blank">Starlette</a>
|
||
- データの部分は<a href="https://pydantic-docs.helpmanual.io/" class="external-link" target="_blank">Pydantic</a>
|
||
|
||
## インストール
|
||
|
||
<div class="termy">
|
||
|
||
```console
|
||
$ pip install fastapi
|
||
|
||
---> 100%
|
||
```
|
||
|
||
</div>
|
||
|
||
本番環境では、<a href="https://www.uvicorn.org" class="external-link" target="_blank">Uvicorn</a> または、 <a href="https://gitlab.com/pgjones/hypercorn" class="external-link" target="_blank">Hypercorn</a>のような、 ASGI サーバーが必要になります。
|
||
|
||
<div class="termy">
|
||
|
||
```console
|
||
$ pip install "uvicorn[standard]"
|
||
|
||
---> 100%
|
||
```
|
||
|
||
</div>
|
||
|
||
## アプリケーション例
|
||
|
||
### アプリケーションの作成
|
||
|
||
- `main.py` を作成し、以下のコードを入力します:
|
||
|
||
```Python
|
||
from fastapi import FastAPI
|
||
|
||
app = FastAPI()
|
||
|
||
|
||
@app.get("/")
|
||
def read_root():
|
||
return {"Hello": "World"}
|
||
|
||
|
||
@app.get("/items/{item_id}")
|
||
def read_item(item_id: int, q: str = None):
|
||
return {"item_id": item_id, "q": q}
|
||
```
|
||
|
||
<details markdown="1">
|
||
<summary>または<code>async def</code>を使います...</summary>
|
||
|
||
`async` / `await`を使用するときは、 `async def`を使います:
|
||
|
||
```Python hl_lines="7 12"
|
||
from fastapi import FastAPI
|
||
|
||
app = FastAPI()
|
||
|
||
|
||
@app.get("/")
|
||
async def read_root():
|
||
return {"Hello": "World"}
|
||
|
||
|
||
@app.get("/items/{item_id}")
|
||
async def read_item(item_id: int, q: str = None):
|
||
return {"item_id": item_id, "q": q}
|
||
```
|
||
|
||
**注**:
|
||
|
||
わからない場合は、<a href="https://fastapi.tiangolo.com/async/#in-a-hurry" target="_blank">ドキュメントの`async` と `await`にある</a>"In a hurry?"セクションをチェックしてください。
|
||
|
||
</details>
|
||
|
||
### 実行
|
||
|
||
以下のコマンドでサーバーを起動します:
|
||
|
||
<div class="termy">
|
||
|
||
```console
|
||
$ uvicorn main:app --reload
|
||
|
||
INFO: Uvicorn running on http://127.0.0.1:8000 (Press CTRL+C to quit)
|
||
INFO: Started reloader process [28720]
|
||
INFO: Started server process [28722]
|
||
INFO: Waiting for application startup.
|
||
INFO: Application startup complete.
|
||
```
|
||
|
||
</div>
|
||
|
||
<details markdown="1">
|
||
<summary><code>uvicorn main:app --reload</code>コマンドについて</summary>
|
||
|
||
`uvicorn main:app`コマンドは以下の項目を参照します:
|
||
|
||
- `main`: `main.py`ファイル (Python "モジュール")
|
||
- `app`: `main.py` の`app = FastAPI()`の行で生成されたオブジェクト
|
||
- `--reload`: コードを変更したらサーバーを再起動します。このオプションは開発環境でのみ使用します
|
||
|
||
</details>
|
||
|
||
### 動作確認
|
||
|
||
ブラウザから<a href="http://127.0.0.1:8000/items/5?q=somequery" class="external-link" target="_blank">http://127.0.0.1:8000/items/5?q=somequery</a>を開きます。
|
||
|
||
以下の JSON のレスポンスが確認できます:
|
||
|
||
```JSON
|
||
{"item_id": 5, "q": "somequery"}
|
||
```
|
||
|
||
もうすでに以下の API が作成されています:
|
||
|
||
- `/` と `/items/{item_id}`のパスで HTTP リクエストを受けます。
|
||
- どちらのパスも `GET` <em>操作</em> を取ります。(HTTP メソッドとしても知られています。)
|
||
- `/items/{item_id}` パスのパスパラメータ `item_id` は `int` でなければなりません。
|
||
- パス `/items/{item_id}` はオプションの `str` クエリパラメータ `q` を持ちます。
|
||
|
||
### 自動対話型の API ドキュメント
|
||
|
||
<a href="http://127.0.0.1:8000/docs" class="external-link" target="_blank">http://127.0.0.1:8000/docs</a>にアクセスしてみてください。
|
||
|
||
自動対話型の API ドキュメントが表示されます。 (<a href="https://github.com/swagger-api/swagger-ui" class="external-link" target="_blank">Swagger UI</a>が提供しています。):
|
||
|
||

|
||
|
||
### 代替の API ドキュメント
|
||
|
||
<a href="http://127.0.0.1:8000/redoc" class="external-link" target="_blank">http://127.0.0.1:8000/redoc</a>にアクセスしてみてください。
|
||
|
||
代替の自動ドキュメントが表示されます。(<a href="https://github.com/Rebilly/ReDoc" class="external-link" target="_blank">ReDoc</a>が提供しています。):
|
||
|
||

|
||
|
||
## アップグレード例
|
||
|
||
`PUT`リクエストからボディを受け取るために`main.py`を修正しましょう。
|
||
|
||
Pydantic によって、Python の標準的な型を使ってボディを宣言します。
|
||
|
||
```Python hl_lines="2 7 8 9 10 23 24 25"
|
||
from fastapi import FastAPI
|
||
from pydantic import BaseModel
|
||
|
||
app = FastAPI()
|
||
|
||
|
||
class Item(BaseModel):
|
||
name: str
|
||
price: float
|
||
is_offer: bool = None
|
||
|
||
|
||
@app.get("/")
|
||
def read_root():
|
||
return {"Hello": "World"}
|
||
|
||
|
||
@app.get("/items/{item_id}")
|
||
def read_item(item_id: int, q: str = None):
|
||
return {"item_id": item_id, "q": q}
|
||
|
||
|
||
@app.put("/items/{item_id}")
|
||
def update_item(item_id: int, item: Item):
|
||
return {"item_name": item.name, "item_id": item_id}
|
||
```
|
||
|
||
サーバーは自動でリロードされます。(上述の`uvicorn`コマンドで`--reload`オプションを追加しているからです。)
|
||
|
||
### 自動対話型の API ドキュメントのアップグレード
|
||
|
||
<a href="http://127.0.0.1:8000/docs" class="external-link" target="_blank">http://127.0.0.1:8000/docs</a>にアクセスしましょう。
|
||
|
||
- 自動対話型の API ドキュメントが新しいボディも含めて自動でアップデートされます:
|
||
|
||

|
||
|
||
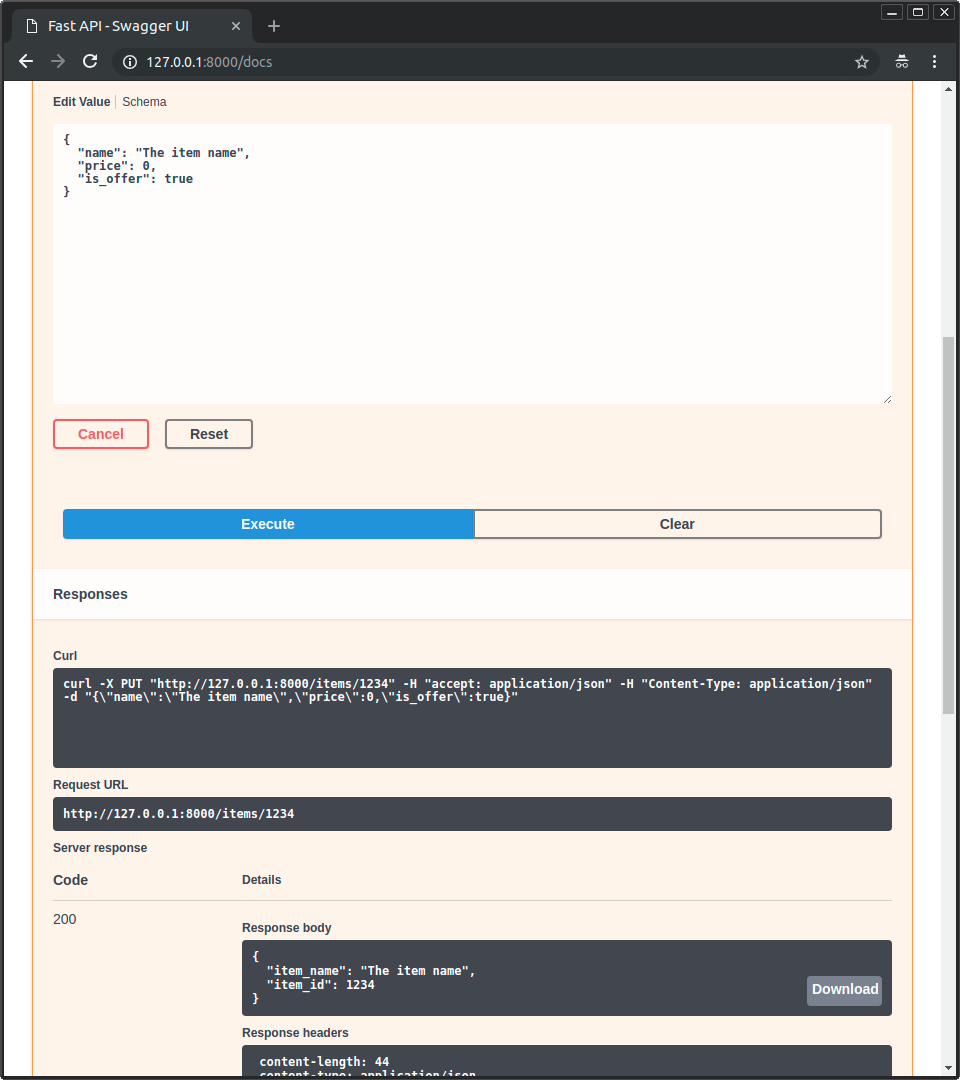
- "Try it out"ボタンをクリックしてください。パラメータを入力して API と直接やりとりすることができます:
|
||
|
||

|
||
|
||
- それから、"Execute" ボタンをクリックしてください。 ユーザーインターフェースは API と通信し、パラメータを送信し、結果を取得して画面に表示します:
|
||
|
||
|
||
|
||
### 代替の API ドキュメントのアップグレード
|
||
|
||
<a href="http://127.0.0.1:8000/redoc" class="external-link" target="_blank">http://127.0.0.1:8000/redoc</a>にアクセスしましょう。
|
||
|
||
- 代替の API ドキュメントにも新しいクエリパラメータやボディが反映されます。
|
||
|
||

|
||
|
||
### まとめ
|
||
|
||
要約すると、関数のパラメータとして、パラメータやボディ などの型を**一度だけ**宣言します。
|
||
|
||
標準的な最新の Python の型を使っています。
|
||
|
||
新しい構文や特定のライブラリのメソッドやクラスなどを覚える必要はありません。
|
||
|
||
単なる標準的な**3.6 以降の Python**です。
|
||
|
||
例えば、`int`の場合:
|
||
|
||
```Python
|
||
item_id: int
|
||
```
|
||
|
||
または、より複雑な`Item`モデルの場合:
|
||
|
||
```Python
|
||
item: Item
|
||
```
|
||
|
||
...そして、この一度の宣言で、以下のようになります:
|
||
|
||
- 以下を含むエディタサポート:
|
||
- 補完
|
||
- タイプチェック
|
||
- データの検証:
|
||
- データが無効な場合に自動でエラーをクリアします。
|
||
- 深い入れ子になった JSON オブジェクトでも検証が可能です。
|
||
- 入力データの<abbr title="also known as: serialization, parsing, marshalling">変換</abbr>: ネットワークから Python のデータや型に変換してから読み取ります:
|
||
- JSON.
|
||
- パスパラメータ
|
||
- クエリパラメータ
|
||
- クッキー
|
||
- ヘッダー
|
||
- フォーム
|
||
- ファイル
|
||
- 出力データの<abbr title="also known as: serialization, parsing, marshalling">変換</abbr>: Python のデータや型からネットワークデータへ変換します (JSON として):
|
||
- Convert Python types (`str`, `int`, `float`, `bool`, `list`, etc).
|
||
- `datetime` オブジェクト
|
||
- `UUID` オブジェクト
|
||
- データベースモデル
|
||
- ...などなど
|
||
- 2 つの代替ユーザーインターフェースを含む自動インタラクティブ API ドキュメント:
|
||
- Swagger UI.
|
||
- ReDoc.
|
||
|
||
---
|
||
|
||
コード例に戻りましょう、**FastAPI** は次のようになります:
|
||
|
||
- `GET`および`PUT`リクエストのパスに`item_id` があることを検証します。
|
||
- `item_id`が`GET`および`PUT`リクエストに対して`int` 型であることを検証します。
|
||
- そうでない場合は、クライアントは有用で明確なエラーが表示されます。
|
||
- `GET` リクエストに対してオプションのクエリパラメータ `q` (`http://127.0.0.1:8000/items/foo?q=somequery` のように) が存在するかどうかを調べます。
|
||
- パラメータ `q` は `= None` で宣言されているので、オプションです。
|
||
- `None`がなければ必須になります(`PUT`の場合のボディと同様です)。
|
||
- `PUT` リクエストを `/items/{item_id}` に送信する場合は、ボディを JSON として読み込みます:
|
||
- 必須の属性 `name` を確認してください。 それは `str` であるべきです。
|
||
- 必須の属性 `price` を確認してください。それは `float` でなければならないです。
|
||
- オプションの属性 `is_offer` を確認してください。値がある場合は、`bool` であるべきです。
|
||
- これらはすべて、深くネストされた JSON オブジェクトに対しても動作します。
|
||
- JSON から JSON に自動的に変換します。
|
||
- OpenAPIですべてを文書化し、以下を使用することができます:
|
||
- 対話的なドキュメントシステム。
|
||
- 多くの言語に対応した自動クライアントコード生成システム。
|
||
- 2 つの対話的なドキュメントのWebインターフェイスを直接提供します。
|
||
|
||
---
|
||
|
||
まだ表面的な部分に触れただけですが、もう全ての仕組みは分かっているはずです。
|
||
|
||
以下の行を変更してみてください:
|
||
|
||
```Python
|
||
return {"item_name": item.name, "item_id": item_id}
|
||
```
|
||
|
||
...以下を:
|
||
|
||
```Python
|
||
... "item_name": item.name ...
|
||
```
|
||
|
||
...以下のように:
|
||
|
||
```Python
|
||
... "item_price": item.price ...
|
||
```
|
||
|
||
...そして、エディタが属性を自動補完し、そのタイプを知る方法を確認してください。:
|
||
|
||

|
||
|
||
より多くの機能を含む、より完全な例については、<a href="https://fastapi.tiangolo.com/tutorial/">チュートリアル - ユーザーガイド</a>をご覧ください。
|
||
|
||
**ネタバレ注意**: チュートリアル - ユーザーガイドは以下の情報が含まれています:
|
||
|
||
- **ヘッダー**、**クッキー**、**フォームフィールド**、**ファイル**などの他の場所からの **パラメータ** 宣言。
|
||
- `maximum_length`や`regex`のような**検証や制約**を設定する方法。
|
||
- 非常に強力で使いやすい <abbr title="also known as components, resources, providers, services, injectables">**依存性注入**</abbr>システム。
|
||
- **JWT トークン**を用いた **OAuth2** や **HTTP Basic 認証** のサポートを含む、セキュリティと認証。
|
||
- **深くネストされた JSON モデル**を宣言するためのより高度な(しかし同様に簡単な)技術(Pydantic のおかげです)。
|
||
- 以下のようなたくさんのおまけ機能(Starlette のおかげです):
|
||
- **WebSockets**
|
||
- **GraphQL**
|
||
- `httpx` や `pytest`をもとにした極限に簡単なテスト
|
||
- **CORS**
|
||
- **クッキーセッション**
|
||
- ...などなど。
|
||
|
||
## パフォーマンス
|
||
|
||
独立した TechEmpower のベンチマークでは、Uvicorn で動作する**FastAPI**アプリケーションが、<a href="https://www.techempower.com/benchmarks/#section=test&runid=7464e520-0dc2-473d-bd34-dbdfd7e85911&hw=ph&test=query&l=zijzen-7" class="external-link" target="_blank">Python フレームワークの中で最も高速なものの 1 つ</a>であり、Starlette と Uvicorn(FastAPI で内部的に使用されています)にのみ下回っていると示されています。
|
||
|
||
詳細は<a href="https://fastapi.tiangolo.com/benchmarks/" class="internal-link" target="_blank">ベンチマーク</a>セクションをご覧ください。
|
||
|
||
## オプションの依存関係
|
||
|
||
Pydantic によって使用されるもの:
|
||
|
||
- <a href="https://github.com/JoshData/python-email-validator" target="_blank"><code>email_validator</code></a> - E メールの検証
|
||
|
||
Starlette によって使用されるもの:
|
||
|
||
- <a href="https://www.python-httpx.org" target="_blank"><code>httpx</code></a> - `TestClient`を使用するために必要です。
|
||
- <a href="https://jinja.palletsprojects.com" target="_blank"><code>jinja2</code></a> - デフォルトのテンプレート設定を使用する場合は必要です。
|
||
- <a href="https://andrew-d.github.io/python-multipart/" target="_blank"><code>python-multipart</code></a> - <abbr title="converting the string that comes from an HTTP request into Python data">"parsing"</abbr>`request.form()`からの変換をサポートしたい場合は必要です。
|
||
- <a href="https://pythonhosted.org/itsdangerous/" target="_blank"><code>itsdangerous</code></a> - `SessionMiddleware` サポートのためには必要です。
|
||
- <a href="https://pyyaml.org/wiki/PyYAMLDocumentation" target="_blank"><code>pyyaml</code></a> - Starlette の `SchemaGenerator` サポートのために必要です。 (FastAPI では必要ないでしょう。)
|
||
- <a href="https://graphene-python.org/" target="_blank"><code>graphene</code></a> - `GraphQLApp` サポートのためには必要です。
|
||
- <a href="https://github.com/esnme/ultrajson" target="_blank"><code>ujson</code></a> - `UJSONResponse`を使用する場合は必須です。
|
||
|
||
FastAPI / Starlette に使用されるもの:
|
||
|
||
- <a href="https://www.uvicorn.org" target="_blank"><code>uvicorn</code></a> - アプリケーションをロードしてサーブするサーバーのため。
|
||
- <a href="https://github.com/ijl/orjson" target="_blank"><code>orjson</code></a> - `ORJSONResponse`を使用したい場合は必要です。
|
||
|
||
これらは全て `pip install fastapi[all]`でインストールできます。
|
||
|
||
## ライセンス
|
||
|
||
このプロジェクトは MIT ライセンスです。
|